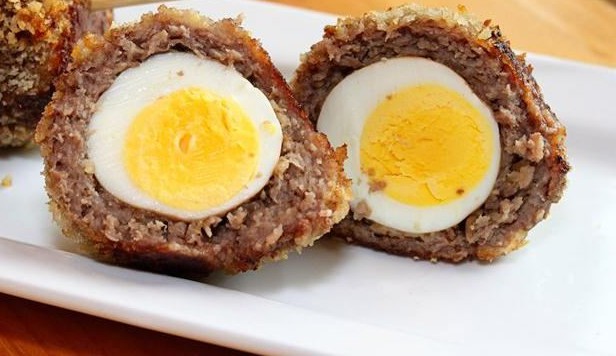
Photo credit: Betty Crocker
! MY OWN PHOTOS COMING SOON !
After a hiatus of over a year (I’m embarrassed, really) and some pretty intense life changes, I can’t think of a better way to come back to the blogosphere than with the topic of Scotch eggs!! I would love to tell you that these are a tradition from my Mom’s side of the family that goes way back to the early 1900s. While I am 25% English (and 25% Scottish even though, despite the name, Scotch eggs are English, not Scottish – but I’ve got both in me!), they COULD be passed down from generations of WASPs, unfortunately that is not even close to the truth, and I found them as a result from my love of all things paleo + meaty + eggy + breakfasty – obviously.
Anyone that knows me knows that I eat hard-boiled eggs for breakfast every weekday and have for the last 3-4 years. I have these phases every couple of months where I get so sick of them and almost grossed out and so I switch it up for a week just to come crawling back to them filled with apologies and begging for forgiveness. So although traditional Scotch eggs are not paleo, the concept of them is SO up my alley and they are so easy to paleo-ify.
Now, I could do a post solely on the art of properly boiling an egg – don’t laugh, it is definitely an art – but instead I will just include a few words about it here, since a boiled egg is the heart of a Scotch egg. When most people imagine a hard-boiled egg they think of the greenish-yellow, sulfur-smelling, dry, chalky excuse for protein. While that disappointing version does still have the same nutritional value as the ones I make, shouldn’t we enjoy our on-the-go eggs? And not just enjoy, but even look forward to them? The ones that I make have a creamy yolk that is bright orange and they don’t smell awful either. Here’s how: cover your eggs in cold water in a pot big enough so they aren’t super crowded. Heat the pot on high heat and as soon as they start to boil, turn off the heat and set the timer for 10 minutes. Once the time is up transfer the eggs directly to an ice bath to stop the cooking process. It’s that easy! Some tips that you can try are adding baking soda to the water once it boils (this is supposed to help the peeling), or when the eggs are done cooking, tap them on the counter to crack them before placing them in the ice bath – this also can help with the peeling process. 10 minutes is what makes the perfect egg for me (i.e., fully cooked white; bright, creamy yolk with a pinpoint-sized dot of runniness in the middle), but you can play around with it if you like it a little more or less hard. Once you have 12 perfectly boiled eggs peeled and ready then that’s the first step to making these Scotch eggs!
This recipe here is a combination of a few of my favorites mixed in with some ideas from my own head. The optional part below, which is taken from the genius that is Mel at The Clothes Make the Girl, one of my most respected paleo blogs, is a really mind-blowing twist on “breading”. The eggs are wonderful either way – the breading method making them take a little longer.
A couple of things to mention regarding the meat/seasoning –
I’ve made these with both ground pork and with Italian sausage with the casing removed. I’ve also used half sausage / half ground beef. These will be great no matter what combination you go with. I wouldn’t recommend using ground turkey for this recipe because you really need a sturdier meat that can hold onto the egg and keep its form when plopped onto a cookie sheet. Turkey is just too soft and won’t work well – stick to any combination of pork and red meat. Related to this – what you use for meat may change how much seasoning you add. If you use straight up ground pork then you may need more seasoning as opposed to using hot or sweet sausage which already has seasoning. I say the more the better. The core of these treats is a hard-boiled egg which can be pretty bland without S+P sprinkled directly on it, so I usually overseason the meat a bit to compensate for that, and when you take a bite of it all that animal product goodness it evens out and causes a near food-gasm. Experiment depending on the meat you use and find a meat to seasoning ratio that works for you!
To make 12 Scotch Eggs:
— Pre-heat oven to 375 degrees and line a baking sheet with parchment paper —
3.5 lbs of ground pork and/or beef and/or sausage meat (casing removed)
3 cloves of garlic, minced
3/4 TBSP salt
1 tsp black pepper
1/4 tsp ground cinnamon
1/2 tsp ground cardamom
1/2 tsp all-spice
1 TBSP fennel seed, crushed with the side of a knife or a mortar & pestle
1/2 tsp garlic powder
dash of cayenne pepper (or more if you want real heat)
1 tsp dried parsley
1 tsp dried oregano
Optional “Breading”
1-2 raw eggs, lightly beaten
6 oz of fried pork rinds, put in food processor until they resemble bread crumbs
Add the meat and all of the spices into a large bowl. Mix and knead with your hands until spices are well incorporated. Really get into to evenly mix those spices. Then separate your meat into 12 even balls — they will need to be good-sized to fit around that egg (this might take some playing-with at first). Mine were about 2.5 inches inches in diameter.
Once you have all of your balls made it’s time to make the magic happen! Flatten your ball into the palm of your hand, pressing around the edges until it’s thin and even. Then place a boiled egg in the middle and wrap the flattened meat around the egg, pinching together the ends where they meet. Roll the meat-covered-egg around between your hands to try and get the meat evenly around the egg. If you see any egg peaking out just keep pinching and rolling. Do this to all of your eggs, placing each one on the parchment.
** If you are using the pork rind “breading” — dump the rind crumbs onto a plate in a thin layer. Roll each ball in the rinds to get a very thin coating , then dip fully into the egg, then back in for another even roll through the crumbs and place back onto the cookie sheet.
Bake them at 375 for 20-25 minutes, depending on size, and for best cooking results turn them over halfway through. Then turn up the heat to 400 and cook for another 10 minutes or so, until they are brown and crispy.
These are so easy to keep in the fridge and grab for breakfast on the run. I like to cut them in half and zap them in the micro for 30 seconds, then sprinkle with S&P. NOM!
ENJOY MY PEEPS! 🙂

January 8, 2015 at 9:11 pm
Welcome back! A Happy and Healthy 2015!
January 10, 2015 at 11:27 am
Thanks Ellen! Same to you! xox